|
The techniques I used to create this sun was quite simple it just took some time to get the effect that I was after. The first problem I had was that the sun is just white when viewed with the naked eye so whatever effect I created it would just be to look good as a white ball is simple to create! I first looked for as much reference pictures of the sun as I could get these where both other people's renderings and actual pictures of the sun using special cameras etc… After looking at all of the images I have the one I liked the best is the start-up to Star Trek Voyager as the USS Voyager flies through the sun flare. Thanks to Mike Marable for testing this for me  and GOOD LUCK! and GOOD LUCK!
|
||||
| Please CLICK on a thumbnail to get a bigger version. | ||||
|
|
||||
|
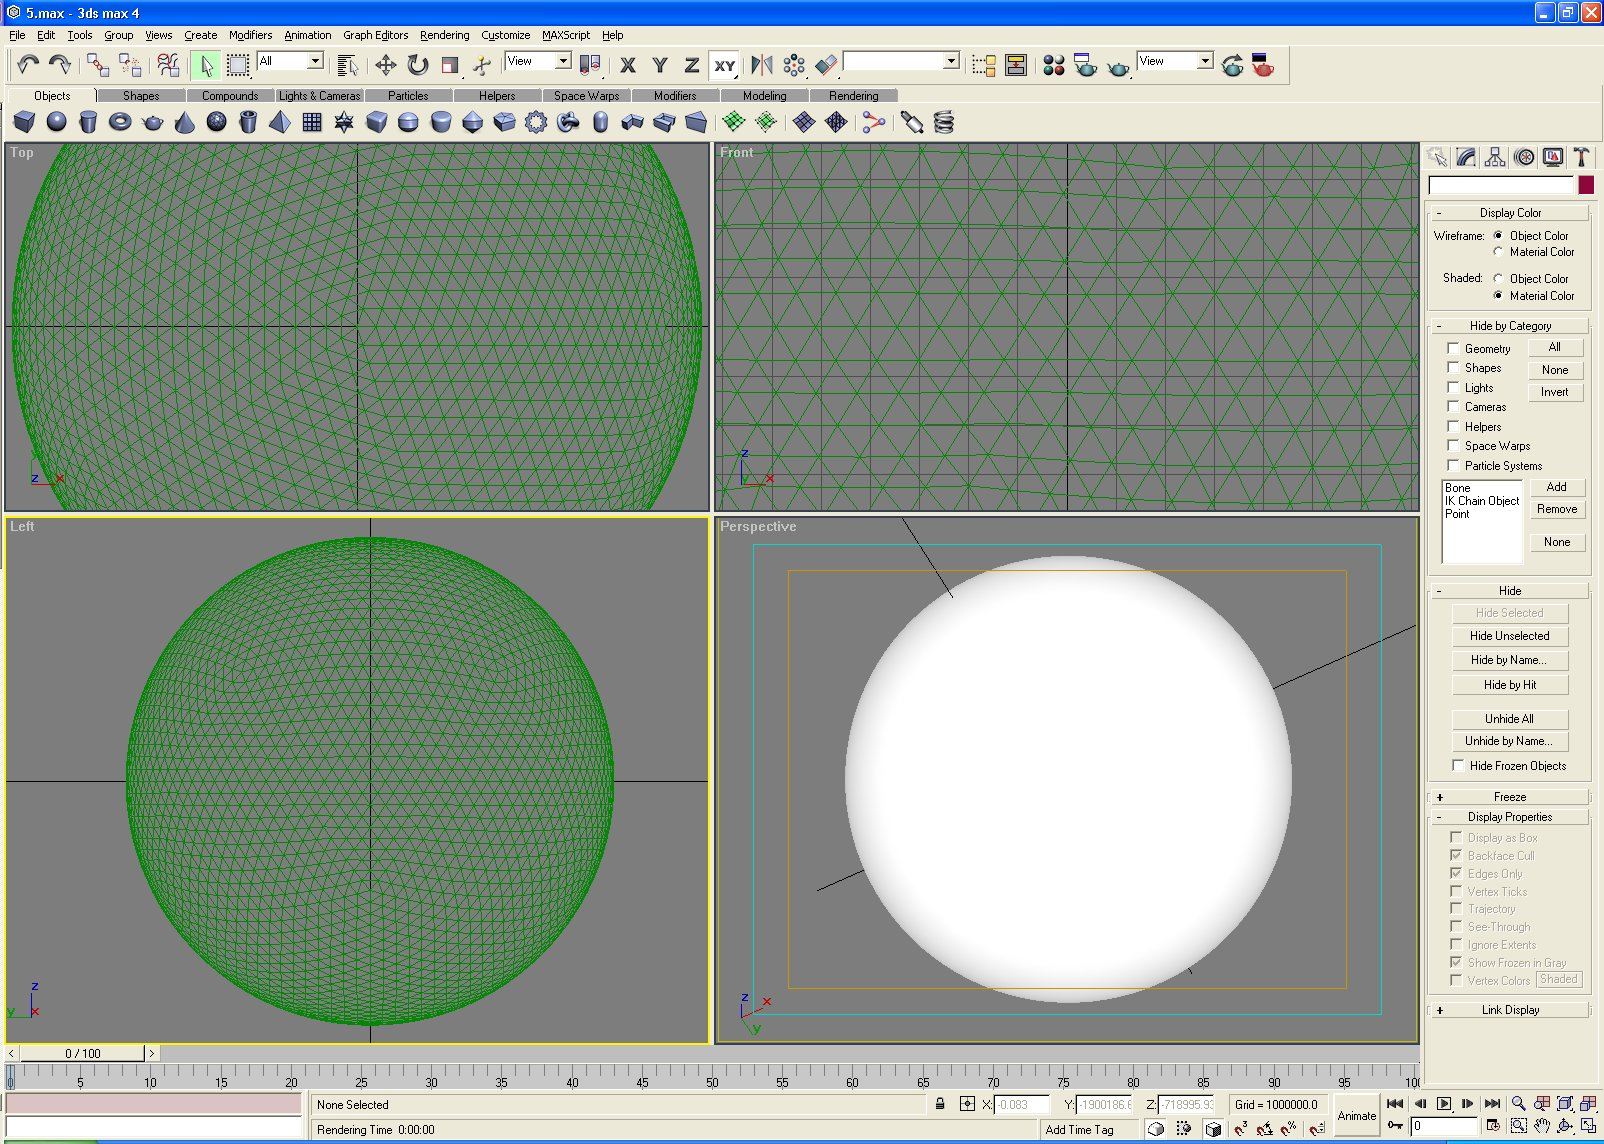
The first thing I did was to find the size of the sun (1390000km in radius) and create a geosphere (you could also use a normal sphere but I found that for the same polygons you get a better effect) of that size. Also change the "Segments" to '20'. As we are creating such HUGE objects I believe it is best to change Max's unit size to km. To do this click on "Customize" on the top bar and then "Preferences…". Now under "System Unit Scale" change it so it says '1 Unit 1.0 Kilometers' and tick "Automatic Unit Conversion" so that when/if you import a object from another scene into this one it maintains its correct size in the scene. | |||
| Now we have a nice sun… but it dose not look like a sun yet instead looks like a huge plastic sphere… to make it look more like a sun we need to give it a nice surface. If you look at the sun of the start to voyager you can see that the surface is made up of a dark orange/red with yellow fluffy patches of varying size. |

|
|||
|
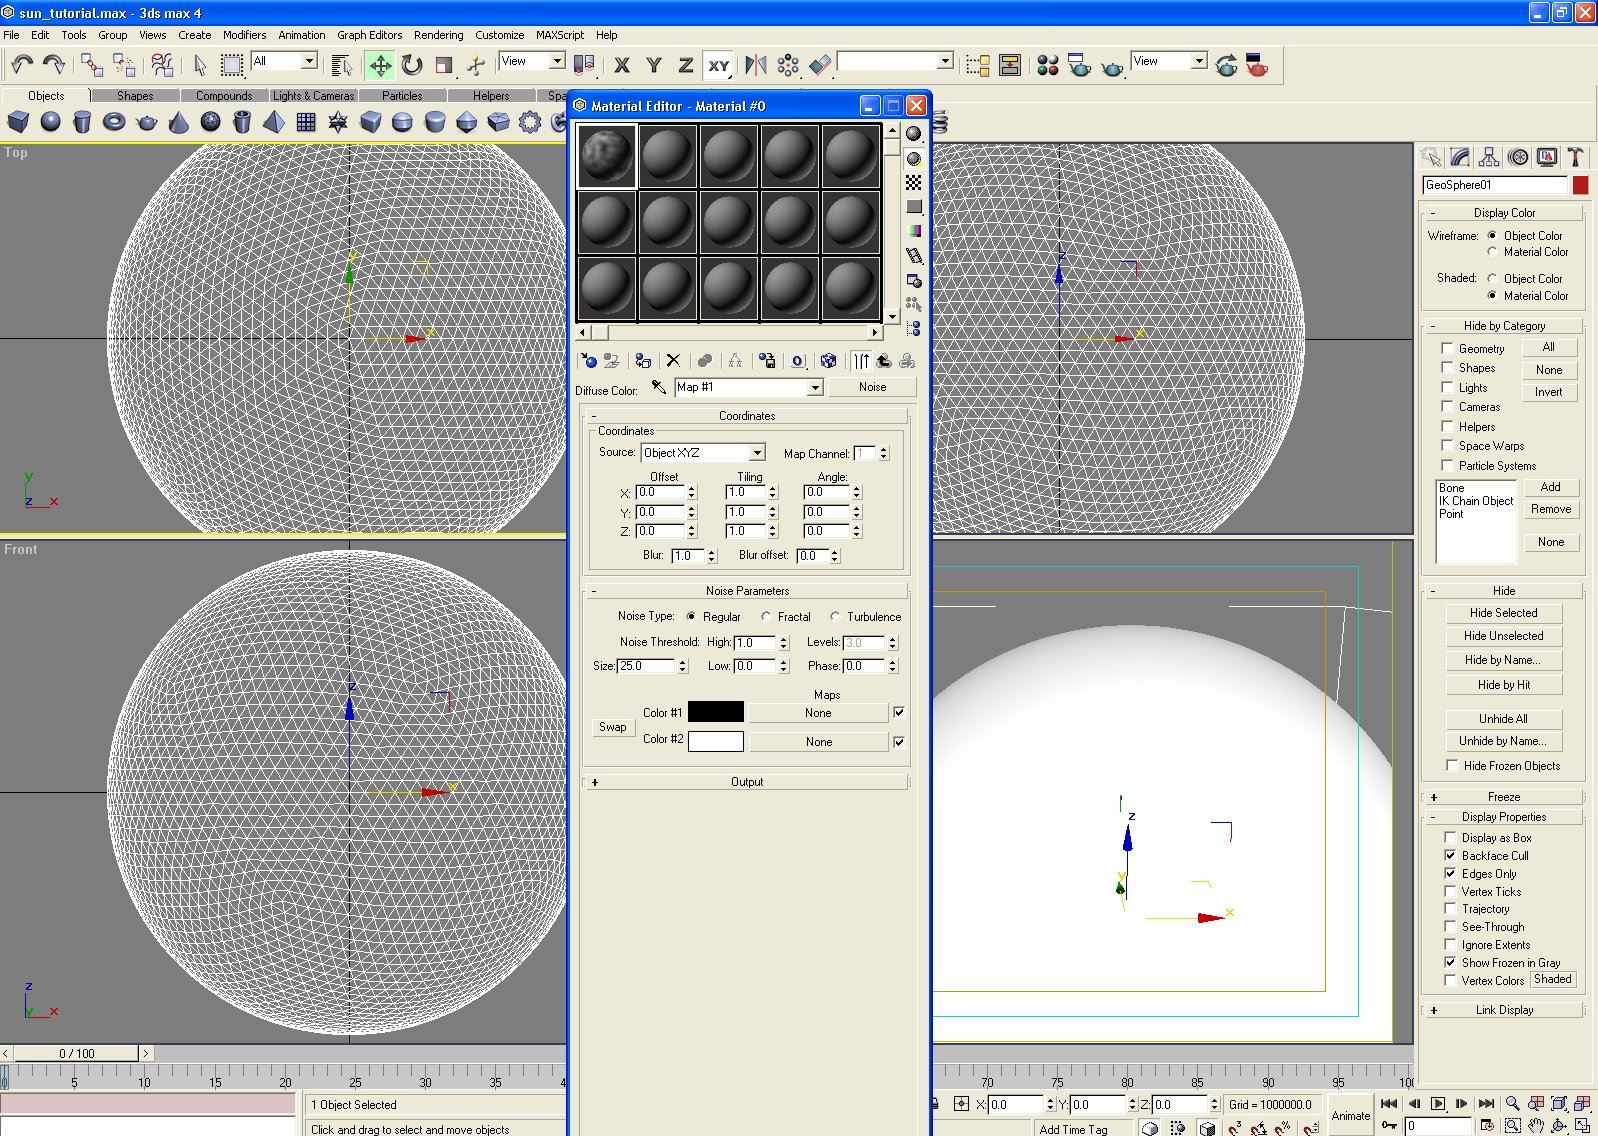
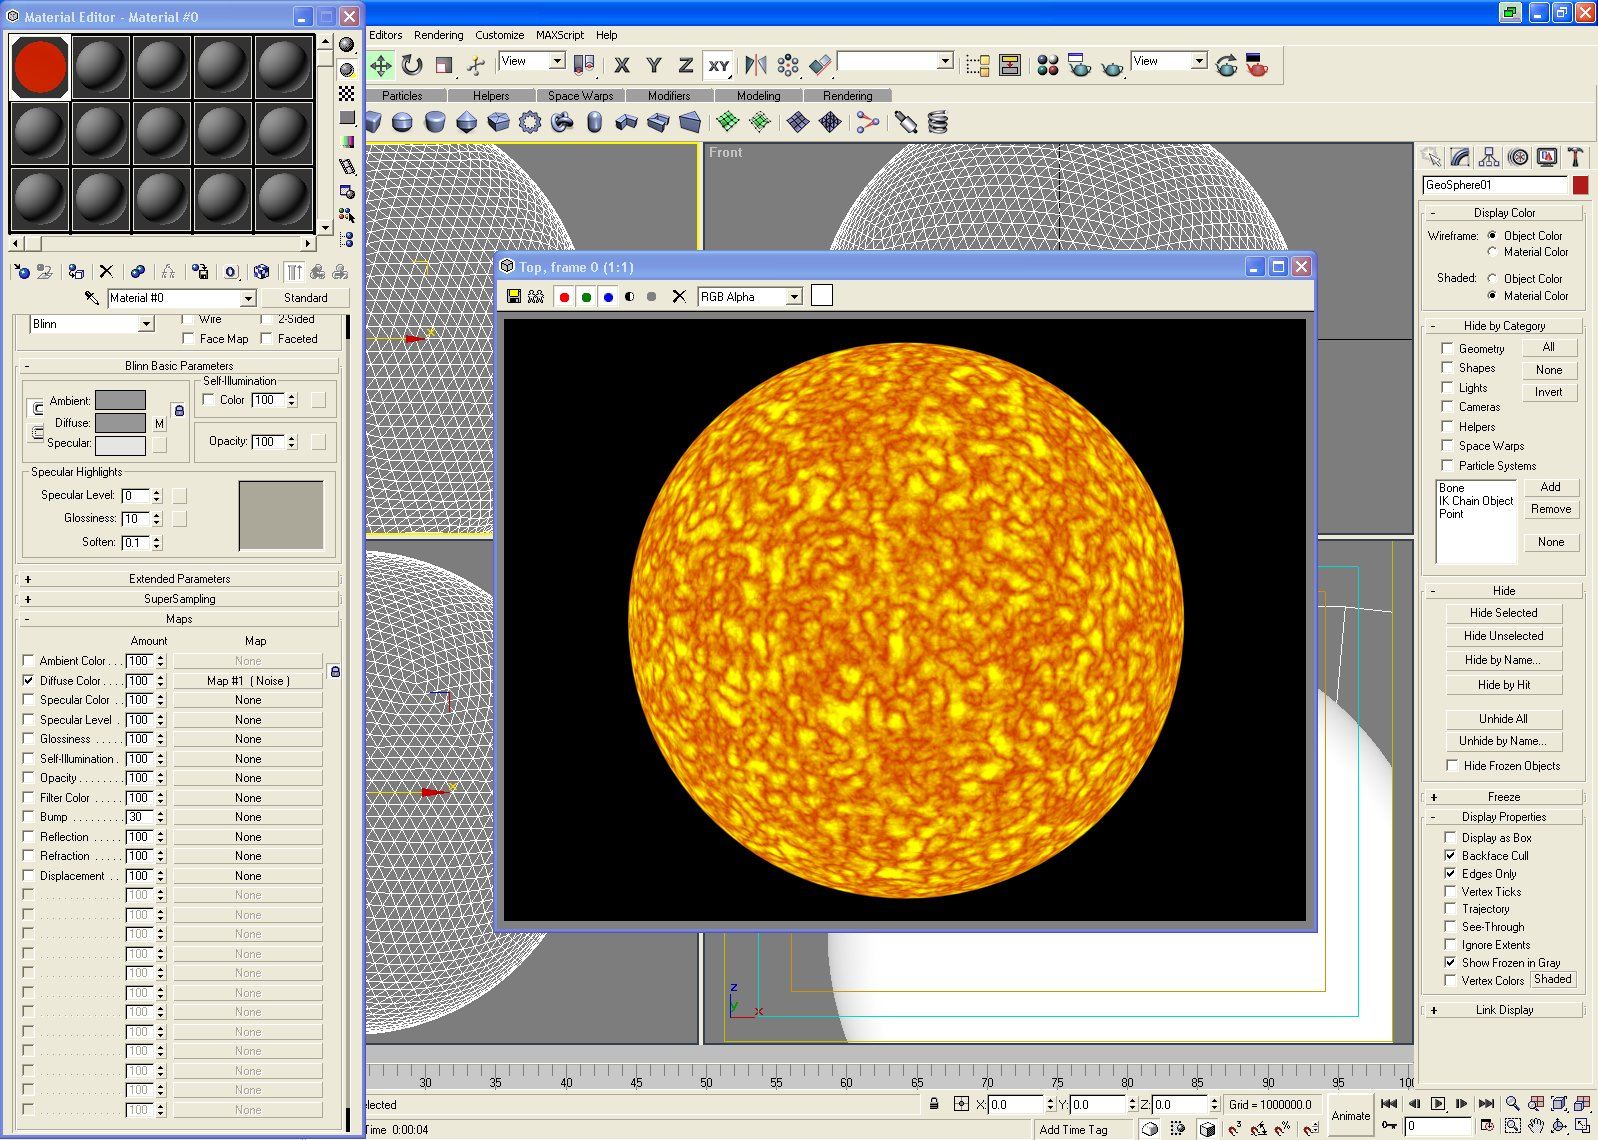
To create this I used a noise map. This is a texture that is generated using a mathematical equation and can be put on any object with a seamless result. It is also VERY versatile as there are lots of options to change like colour, size and effect of the map. If you don't know how to use this map first open up the material editor (m key by default) then select an unused texture (displayed as a sphere) from the top of the window. Next go to the maps tab and click the "None" button to the right of "Diffuse Color". Now scroll down until you find "Noise" and double click / select and click "OK" | |||
Now if you double click on the sphere that we earlier select in the top of the material editor's window another small window will open with a larger picture of the sphere in it (You can resize this window but the bigger it is the longer it will take to refresh). As you can see this dose not look much like a sun yet (Maybe a dead one!  ). For a start it is the wrong colour as it is black and white not dark orange and yellow. To correct this click the black box next to "Color #1" in the "Noise Parameters" section in the material editor window (which we HAVE NOT CLOSE! ). For a start it is the wrong colour as it is black and white not dark orange and yellow. To correct this click the black box next to "Color #1" in the "Noise Parameters" section in the material editor window (which we HAVE NOT CLOSE!  ) and select a colour from the popup window. I used Red: 201 Green: 33 and Blue: 0 (That was found through trial and error but you may want to change it ether now or later.) Now select the white square under the black one we just changed and select your second colour. I used Red: 255 Green: 255 and Blue: 0. Hum… It is looking better but still very blurry. Try changing the "Noise Type" I used "Turbulence". ARR! Very RED! Try messing around with the "Noise Threshold's" "High" and "Low" I found having the high at .5 and the low at 0 worked for me. If you increase the "Levels" you will find it becomes more detailed. Put it up to max (10). Now drag the small sphere from the top of the material editor window onto the top of your sun in one of the main windows and render... ) and select a colour from the popup window. I used Red: 201 Green: 33 and Blue: 0 (That was found through trial and error but you may want to change it ether now or later.) Now select the white square under the black one we just changed and select your second colour. I used Red: 255 Green: 255 and Blue: 0. Hum… It is looking better but still very blurry. Try changing the "Noise Type" I used "Turbulence". ARR! Very RED! Try messing around with the "Noise Threshold's" "High" and "Low" I found having the high at .5 and the low at 0 worked for me. If you increase the "Levels" you will find it becomes more detailed. Put it up to max (10). Now drag the small sphere from the top of the material editor window onto the top of your sun in one of the main windows and render...
|
|
|||
|
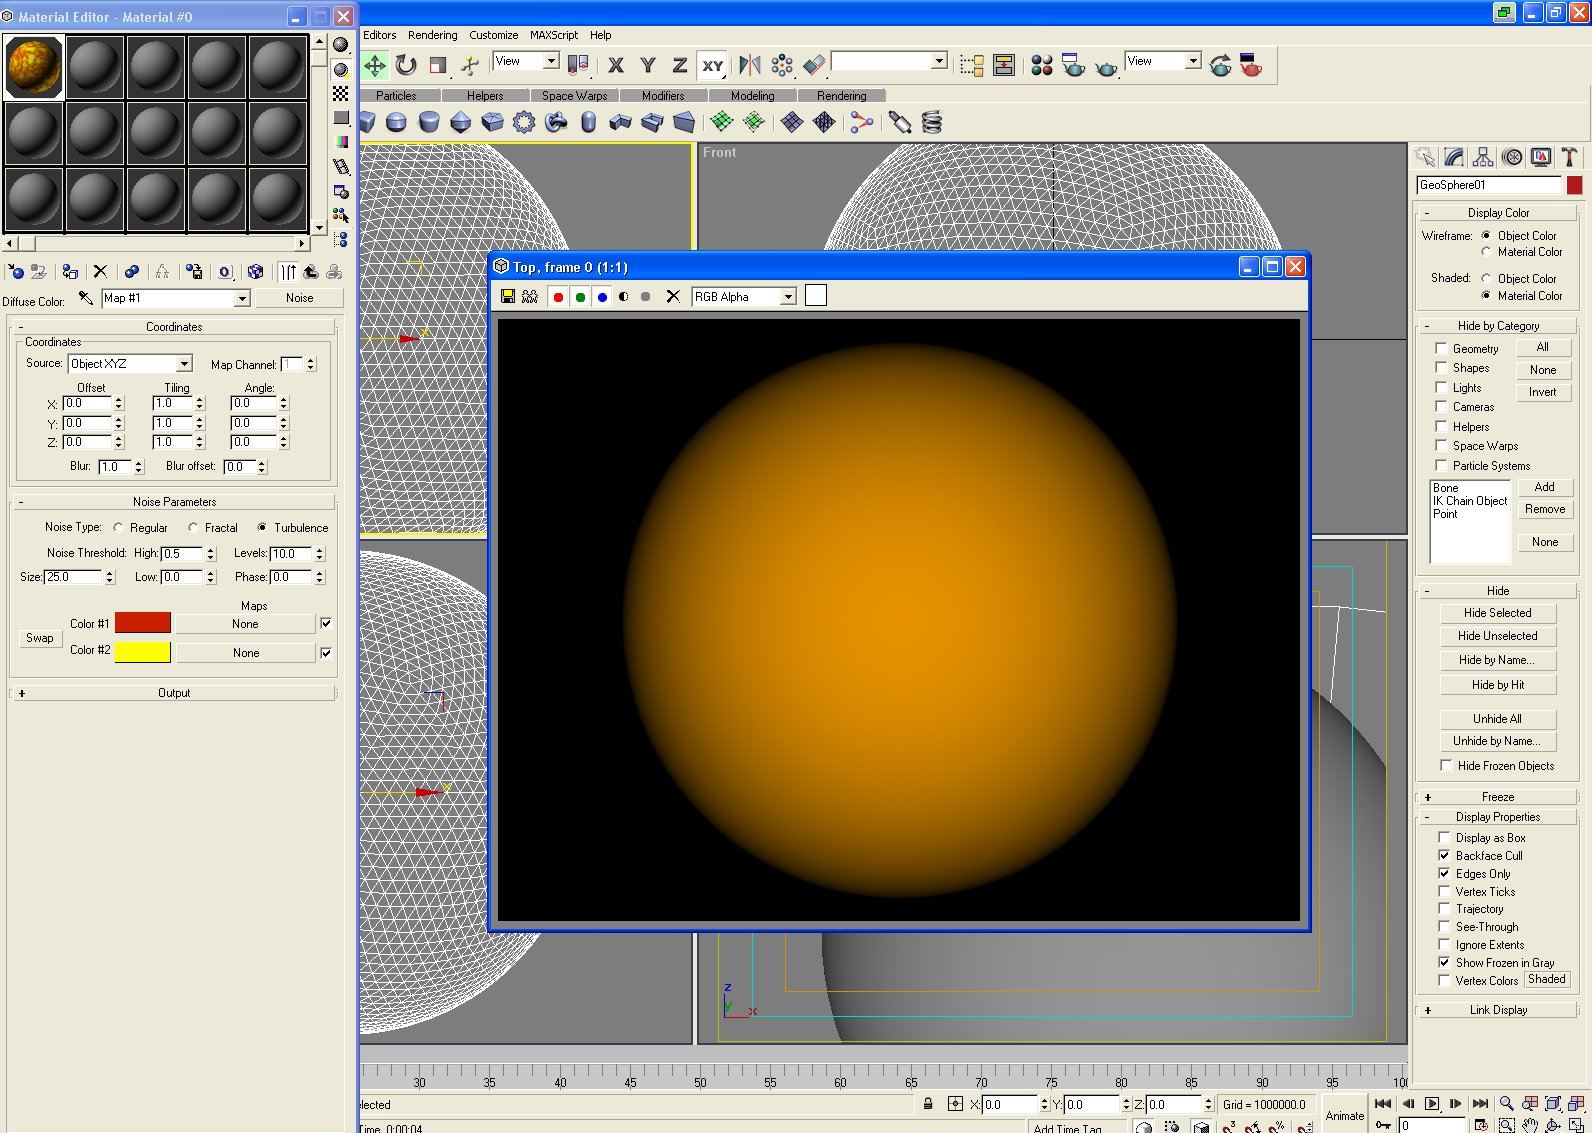
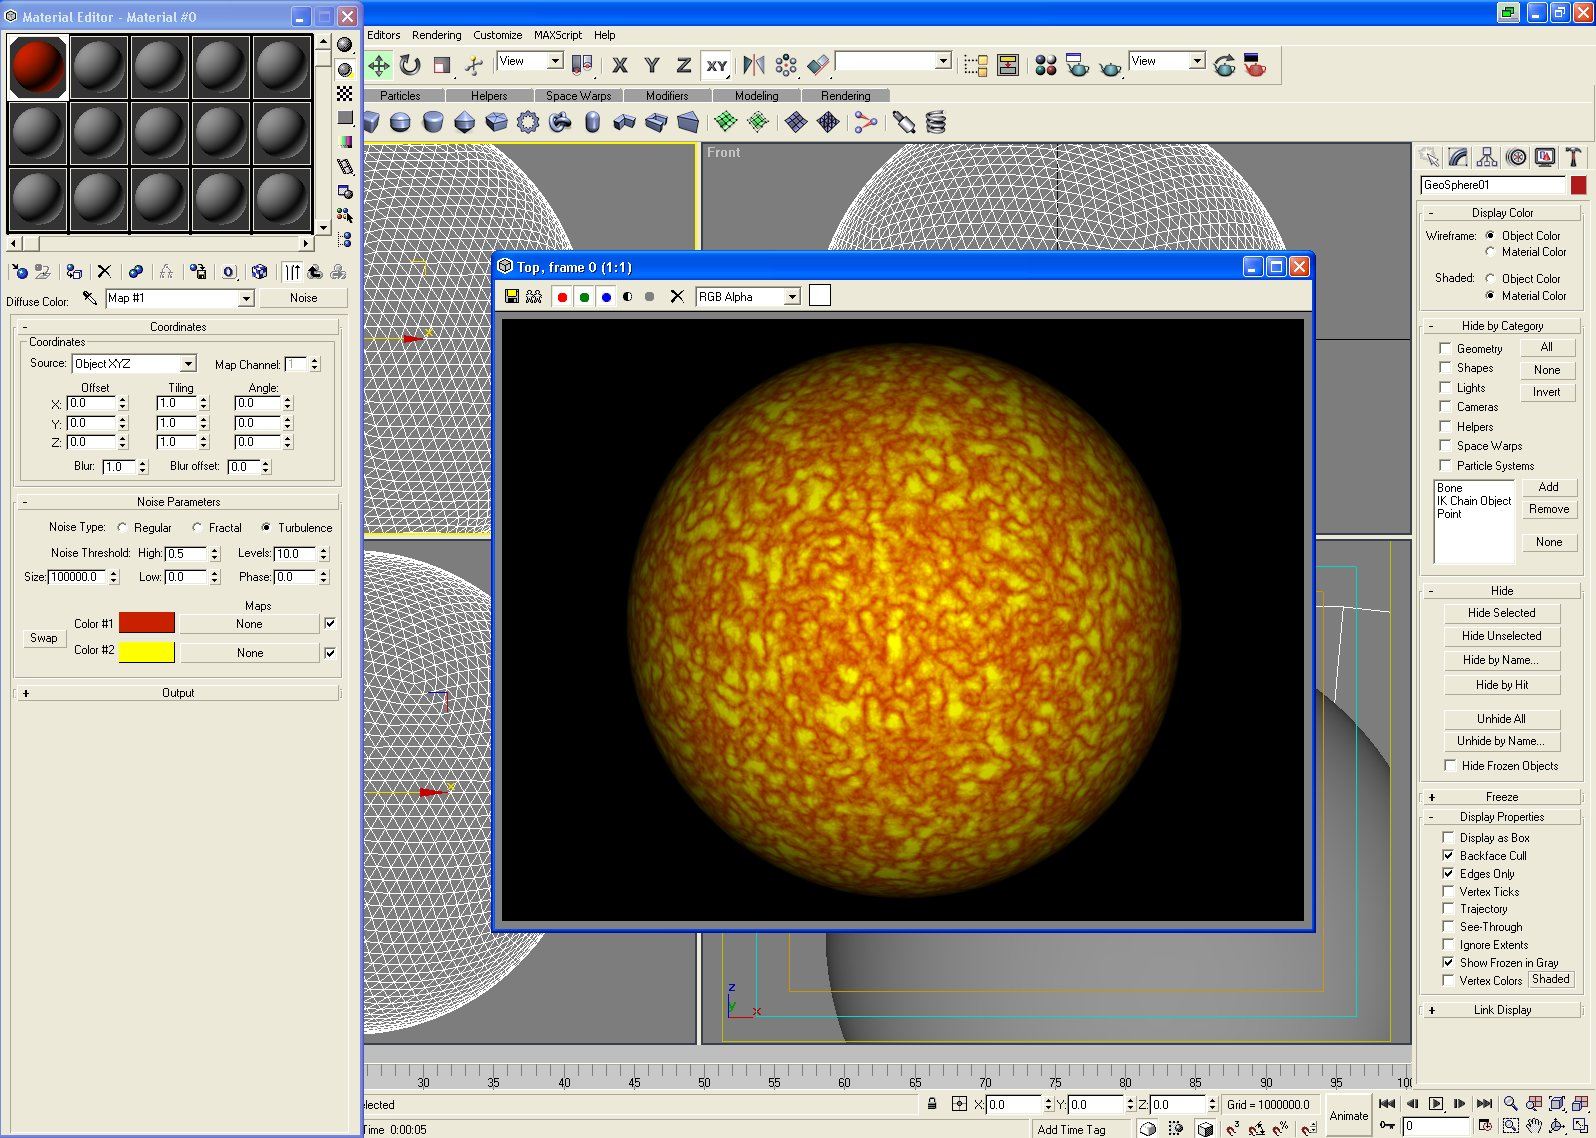
If yours turned out like mine it just looks like a big orange blur! What has happened is that our sun is SO BIG that the texture just repeats too many times. To stop this we need to increase the size of the texture. Go back to the "Noise Parameters" in the material editor window and increase the "Size" option and keep re-rendering until you think it looks OK. I used the HUGE value of '100000' and re-render... LOOK IT IS A SUN… Well it looks a BIT better anyway! | |||
| Our sun has shadows on it! NOT very bright… To solve this click on the "Go to Parent". Then increase the Self-Illumination to max (100). Re-render… Now it is all bright. |
|
|||

|
The sun looks nice but is very… simple and boring. If you look at the sun we are trying to re-create the one from the ST Voy start-up you will notice the surface is very varied and random. So we need to do this as well. First we need to create a variety of sizes and shapes of the texture. To do this copy the original texture from the button next to the "Diffuse Color" by dragging it to a empty sphere at the top of the "Material Editor" when it asks if you what Method to use select "Instance" (When ever this apears unless I say otherwise always go for "Instance") the sphere should turn into a solid square this can not be applied to a object but is the raw texture. Now drag the new texture to two more squares. | |||
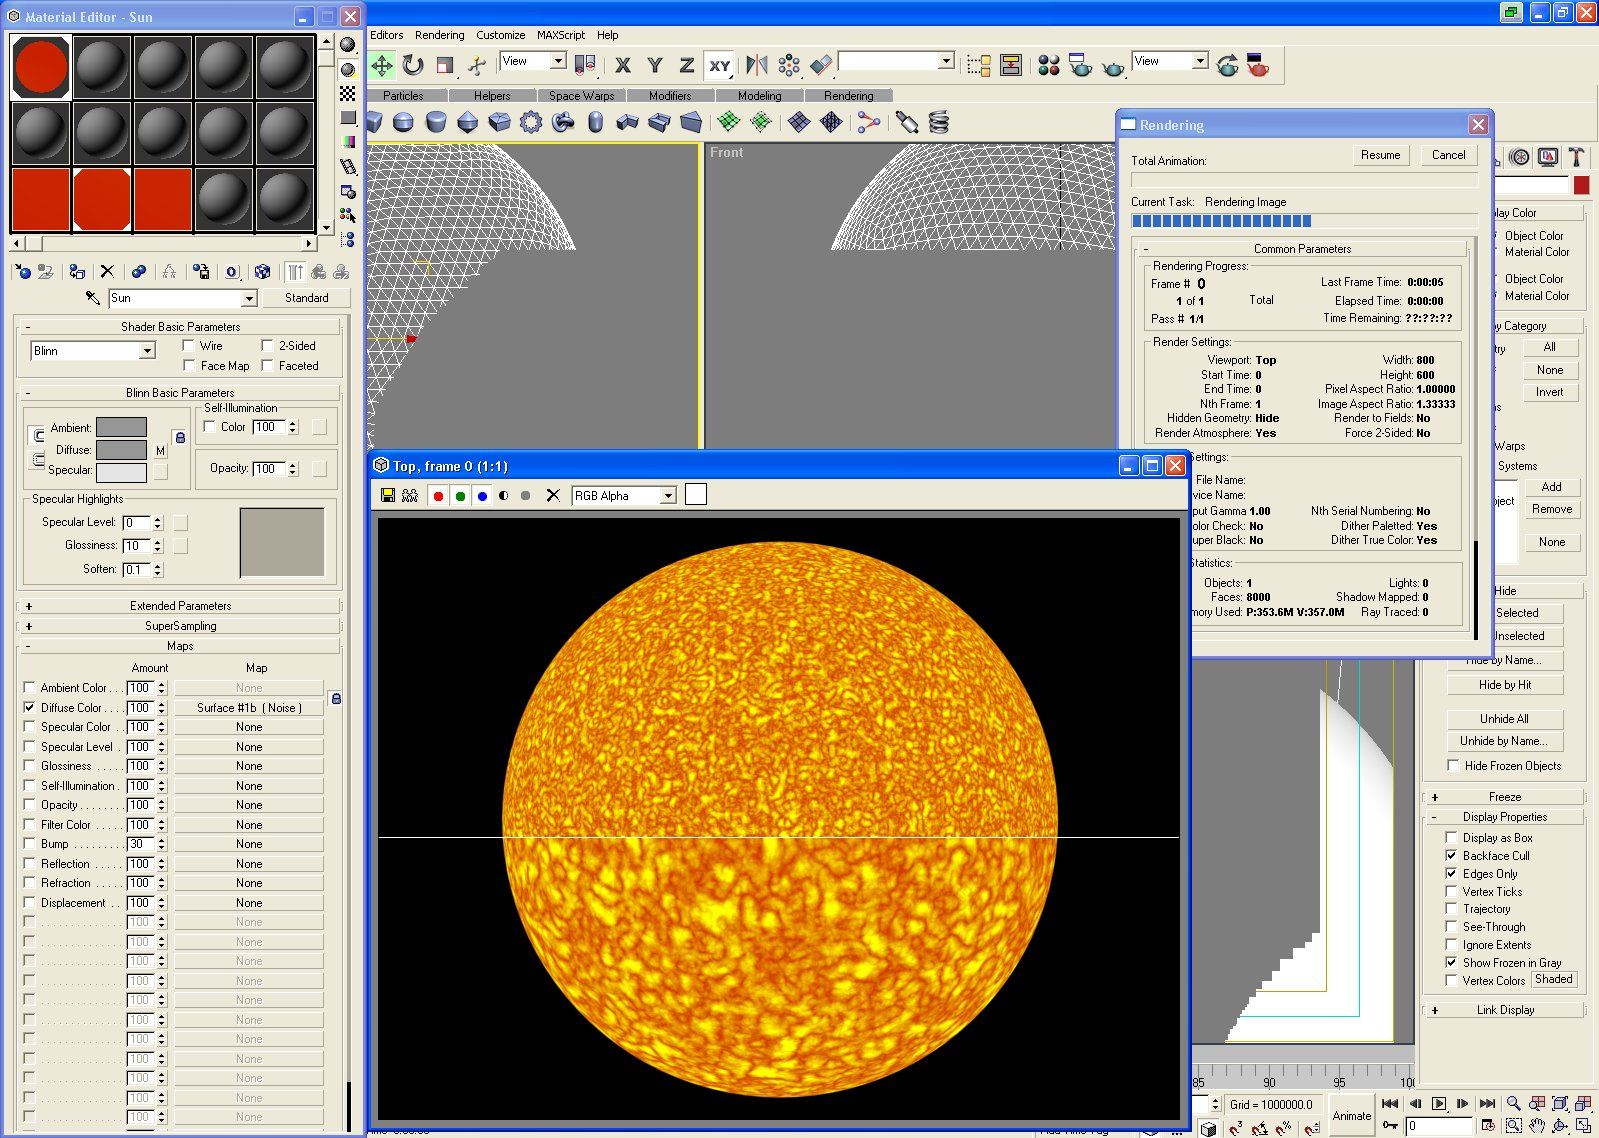
| Now select one of the textures we just copied and select the whole of the box just below the spheres called "Map #-" (The - will be a number) just under the all of the pictures of the spheres and rename it Surface 1 or Sun 1 or whatever your imagination can conceive to help you know what it is at a later date! For this tutorial we will use 'Surface #1a' now repeat this process for one of the other copies and name it 'Surface #1b'. Then finally rename the sphere looking one (The fist one we used) to 'Sun'. Select the texture "Surface #1b" and go into the noise properties then change the "Size" to a smaller figure I used '40000' this will make the texture more that half the size of "Surface #1a". To test it open "Sun" and then drag and drop the new texture "Surface #1b" onto the map box that should currently say "Surface #1a (Noise)". When prompted select "Instance" as normal to apply the texture to the diffuse map of the sun material. It should now say "Surface #1b (Noise)". The texture named "Sun" and "Surface #1b" should now have small triangles in each corner of their boxes. If they do then select our sun (The object) but don't close the material editor and make sure that the triangles go white if so then that means that the textures are applied to the selected objects. If they stay grey that means that they are applied to a different object in the scene and if the texture pictures don't have small triangles in the corners that means that they are not applied to any objects in the scene as of yet. If they are applied to the sun object then re-render if no then drag and drop the texture onto our sun object in the scene and the triangles should appear then re-render. The surface texture should look very similar but just smaller. |
|
|||
|
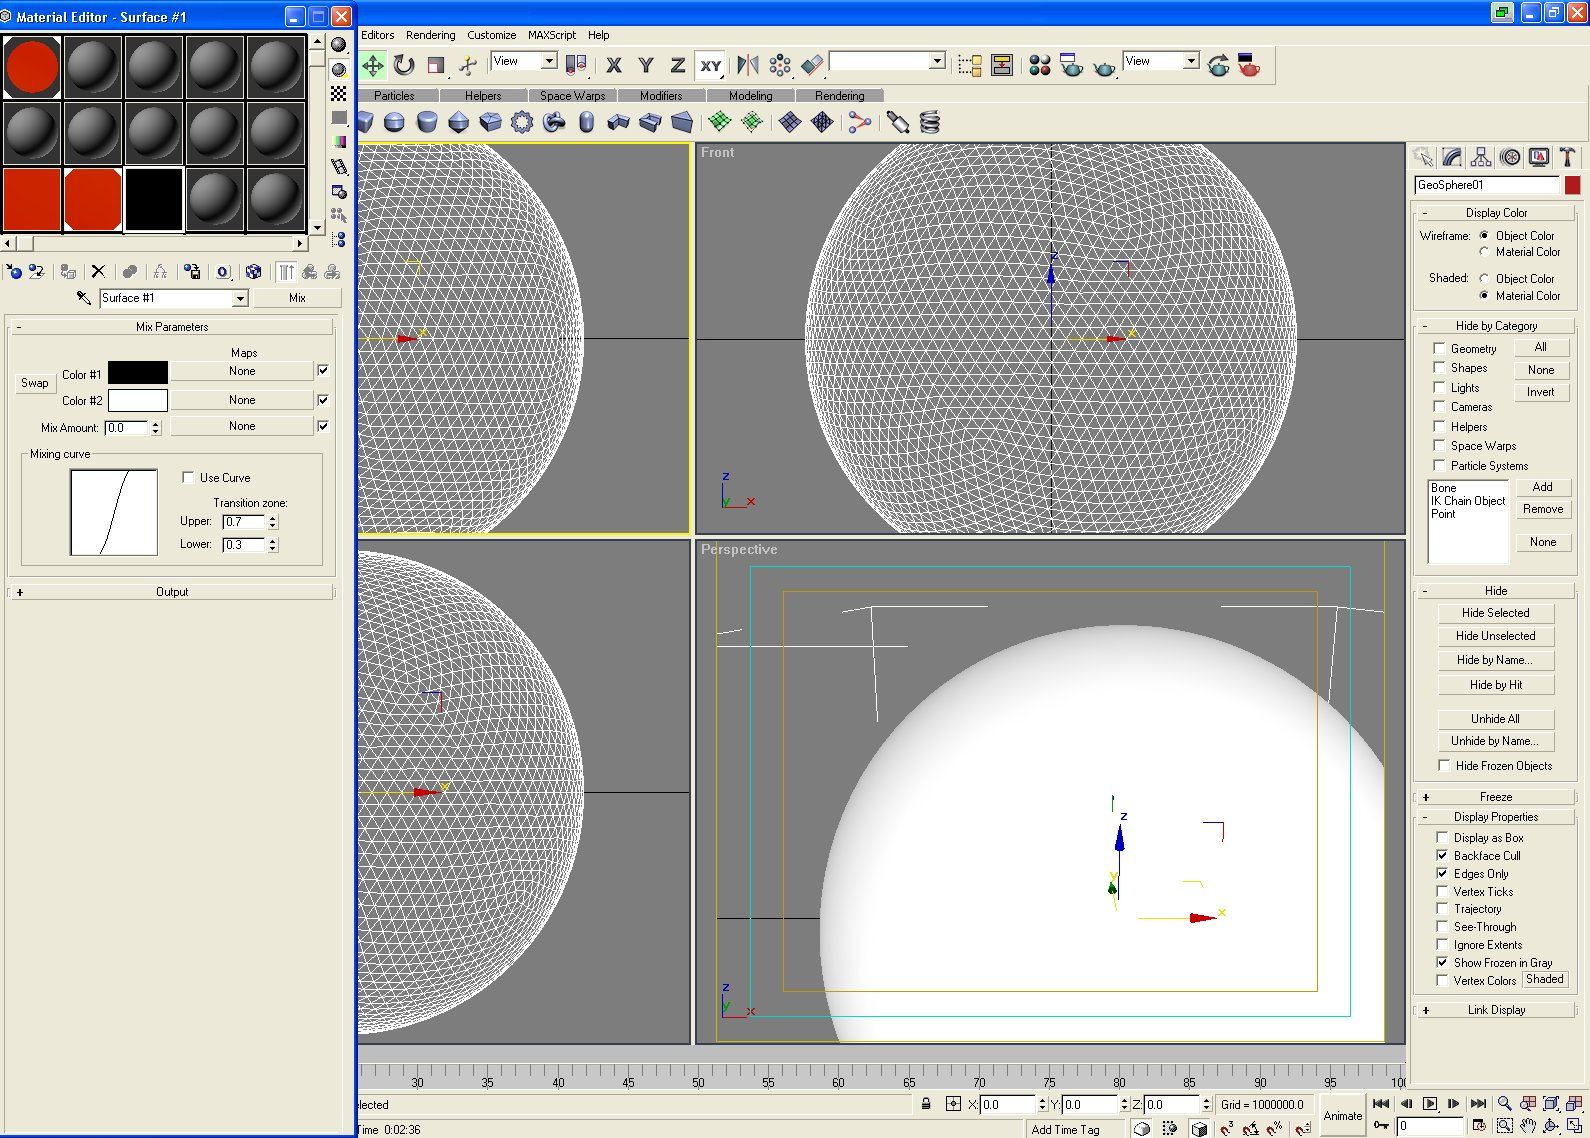
Now we must put these two textures into one. To do this we need to make a "Mix" texture. As I don't know how to directly turn one of the empty material slots (Spheres) into a texture we will just copy one of the other textures (Red squares currently) onto an empty slot. But as we have a spare one from earlier we will use that this time. It should be called something like "Map #2". Now rename the texture to 'Surface #1'. Now we have a texture that we can use to mix the other two together with so now we need to change it from a "Noise" to a "Mix" do this by clicking the button named "Noise" to the left of the name of the texture and find and select "Mix" from the new list that appears. When the question comes up asking if you want to replace map select "Discard old map?" (As before if this comes up select "Discard old map?" unless I specify otherwise). This will erase the noise map that we don't need and replace it with a mix map. | |||
| Now drag and drop "Surface #1a" onto the map box/button with "Color #1" and a black box next to it and repeat this with "Surface #1b" onto the other one (Color #2). Now we need to tell it how to mix the textures. We will do this with ANOTHER texture… So make another copy of one of the textures and rename it 'Mix #1'. Now click the "Noise" or "Mix" button (Depending on which texture you copied) next to the texture's name and select "Noise" again and "Discard Old Map" (This will reset the parameters.). Now change the "Noise Type" to "Fractal" and the "Noise Threshold: High" to '0.7' the "Low" to '0.45' the "Size" to '300000' the "Level" to '1' and the "Phase" to '30' (These values were acquired through trial and error so you can and should mess around with them when we have finished applying this mix.). Now go to the mix texture "Surface #1" and drag and drop the texture "Mix #1" onto the button to the left of "Mix Amount". This will use the noise texture we just created "Mix #1" to decide what part of the surface should be "Surface #1a" and what part should be "Surface #1b" by using the black parts of the "Mix #1" for one and the white parts for the other. Select the material "Sun" and drag and drop the texture "Surface #1" onto the diffuse colour map. Then re-render the scene… The surface of our sun should now look a bit more random with some small clouds and some larger ones. |

|
|||
|
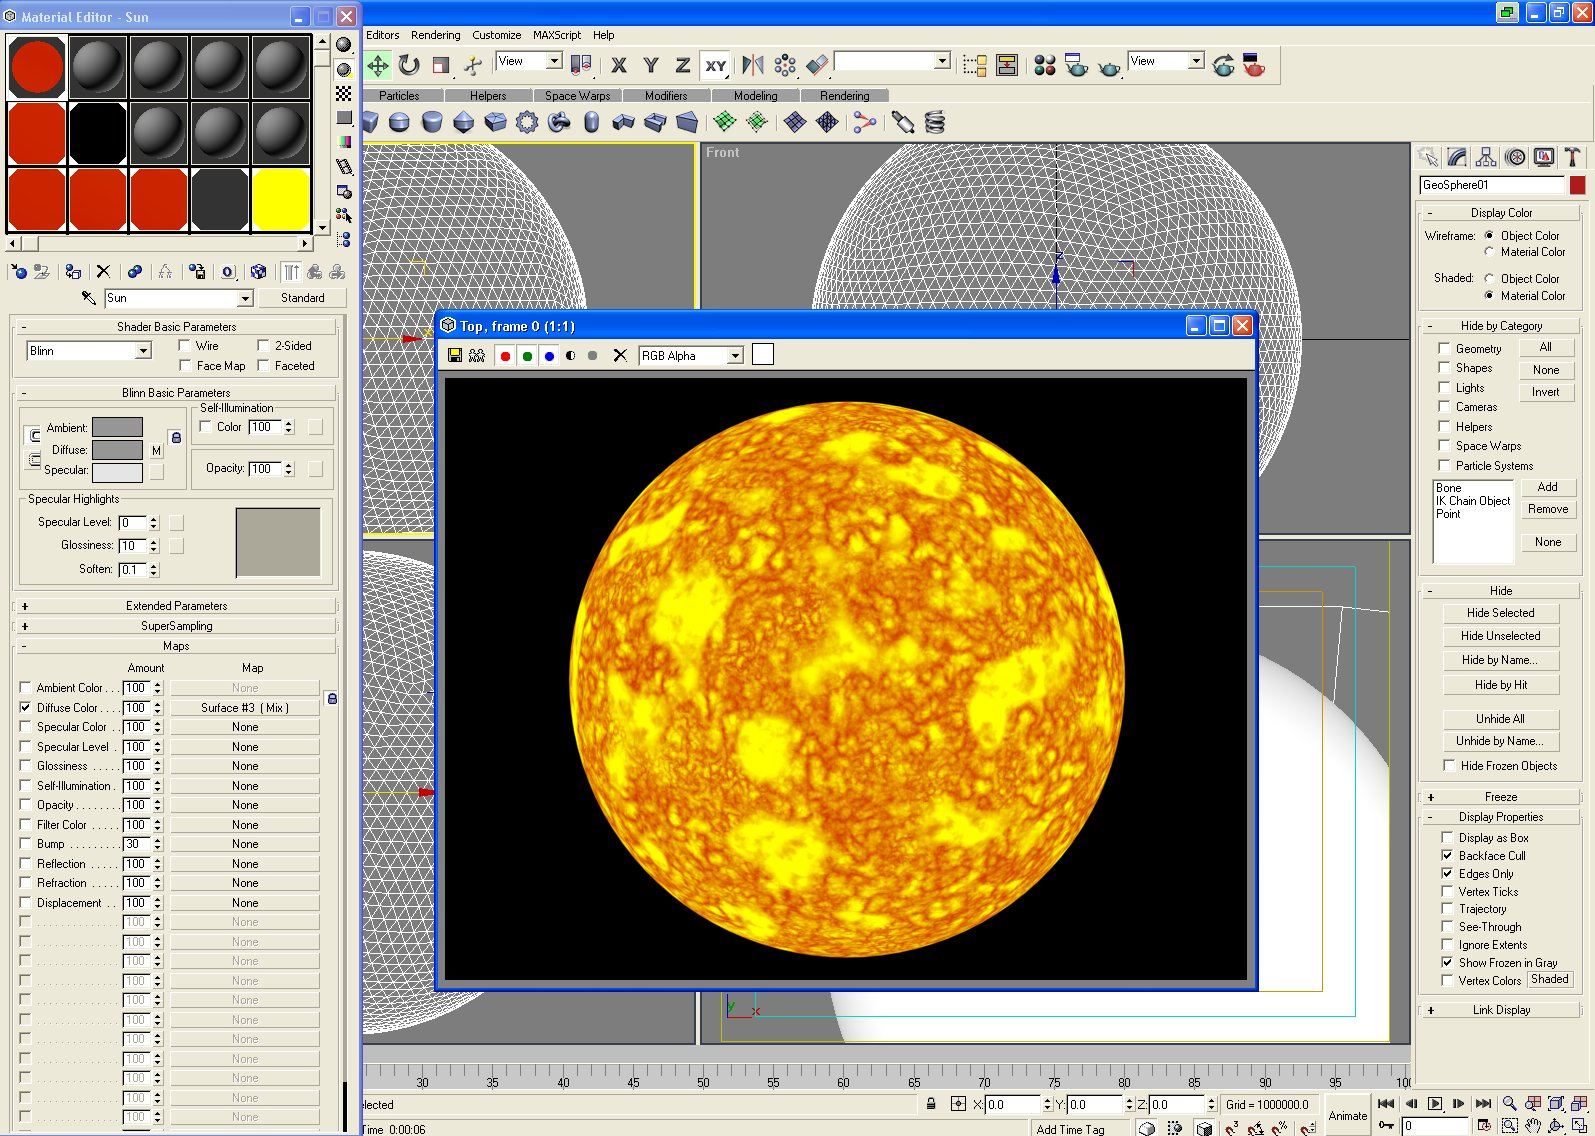
Now we need to give the colour a bit of a verity. So make a new copy of the texture "Surface #1a" or "Surface #1b" into a blank slot and rename it "Surface #2". Change the "Noise Type" to "Fractal" and the "Size" to '100000'.Now copy "Surface #1" to a new slot and rename it 'Surface #3' then drag and drop "Surface #1" into the first map slot and the newly created "Surface #2" onto the second one. Now for the mixing options. Copy any texture to an empty slot and rename it "Mix #2" and reset/make its parameters to a "Noise". Then change the "High" to '0.6' the "Low" to '0.55' and the "Size" to '300000'. This is just another noise map we will use to mix our two different coloured surfaces/textures together. Drop "Mix #2" into the "Mix Amount" slot of "Surface #3" and then drop "Surface #3" into the diffuse map slot of "Sun" then re-render… What do you think? | |||
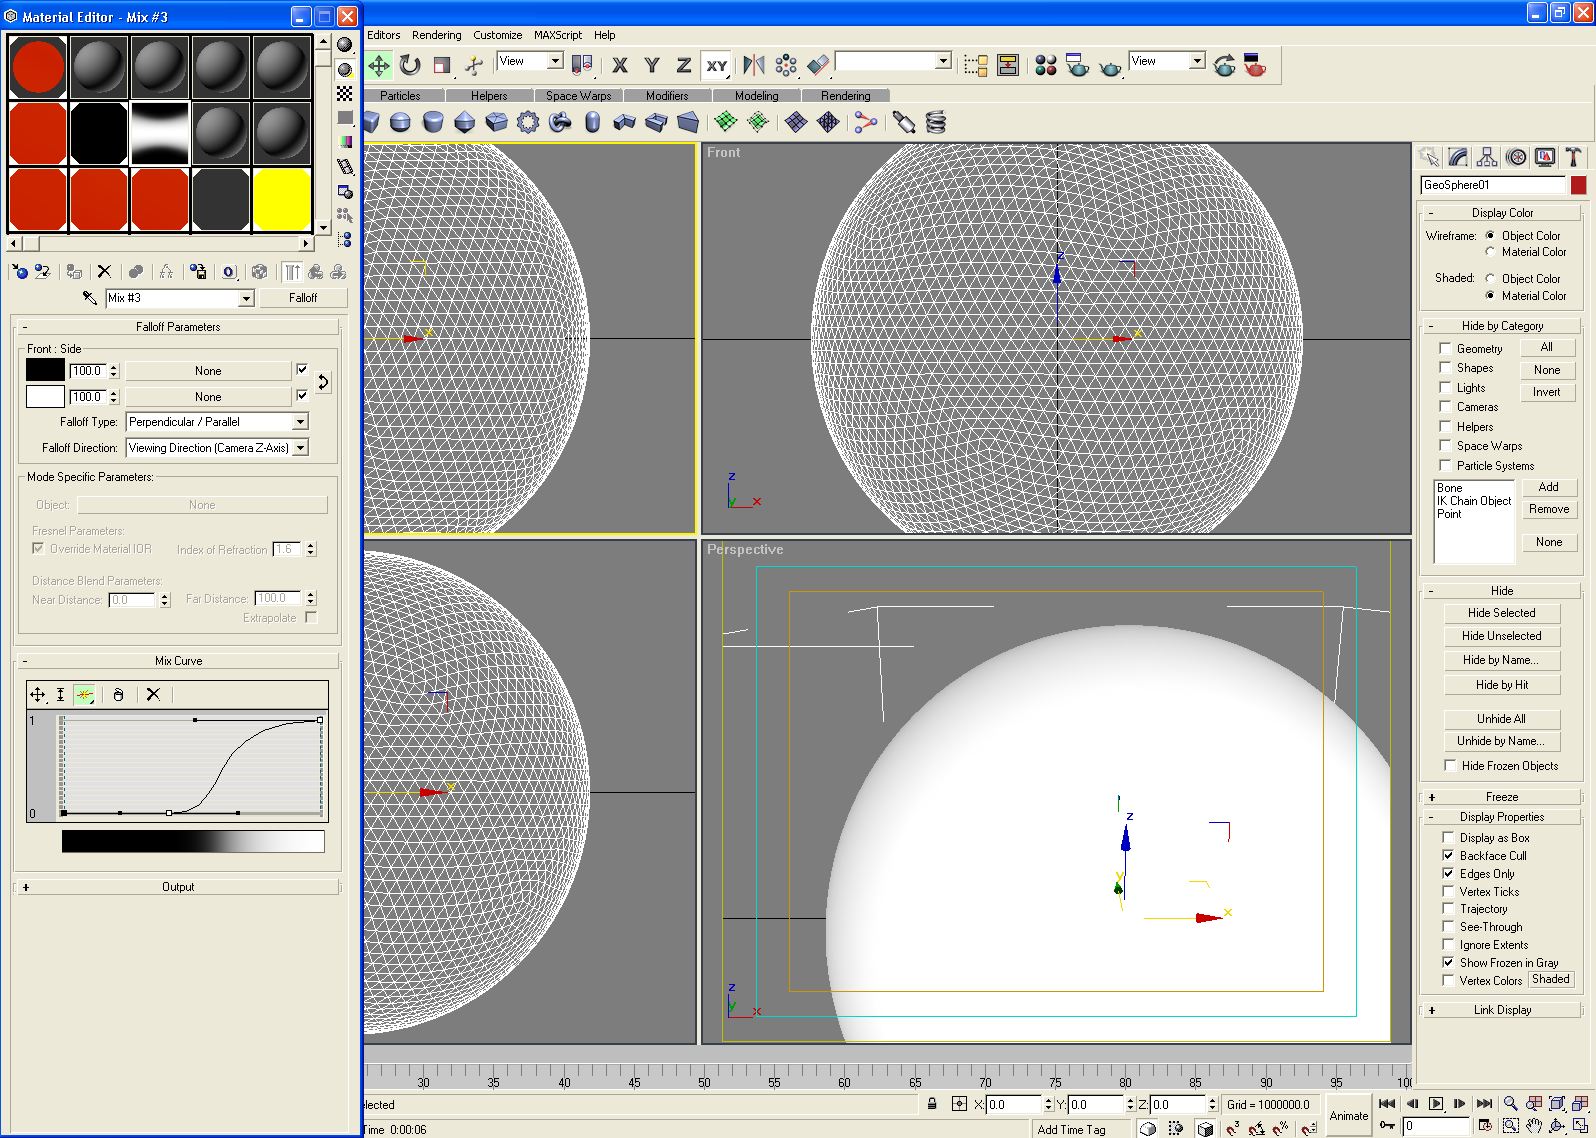
| It looks good… BUT! The edges of our reference sun (The one from ST Voy) go a lot brighter. So let's have a go at that! First create a new texture in an empty slot and name it 'Mix #3' and change its type to a "Falloff" (Same place as "Noise") then select "Discard Old Map". Now this part needs trial and error on YOUR part! As there is no numbers I can tell you just a picture. Go to "Mix Curve" and click the "Add point" button then click on the line (Graph) somewhere. A small white square should now have appeared on the line at the point you clicked. Now right click that square and select "Bezier-Corner" now click the "Move" button to the top left of the graph (Looks like 4 arrows pointing from the centre.) and drag the square down to the bottom of the graph in the centre region of the graph. Now right click the square in the top right of the graph and select "Bezier-Corner" again. Ok the graph is now ready for you to move the points around to make them/it look like the graph shown in the picture. |
|
|||
|
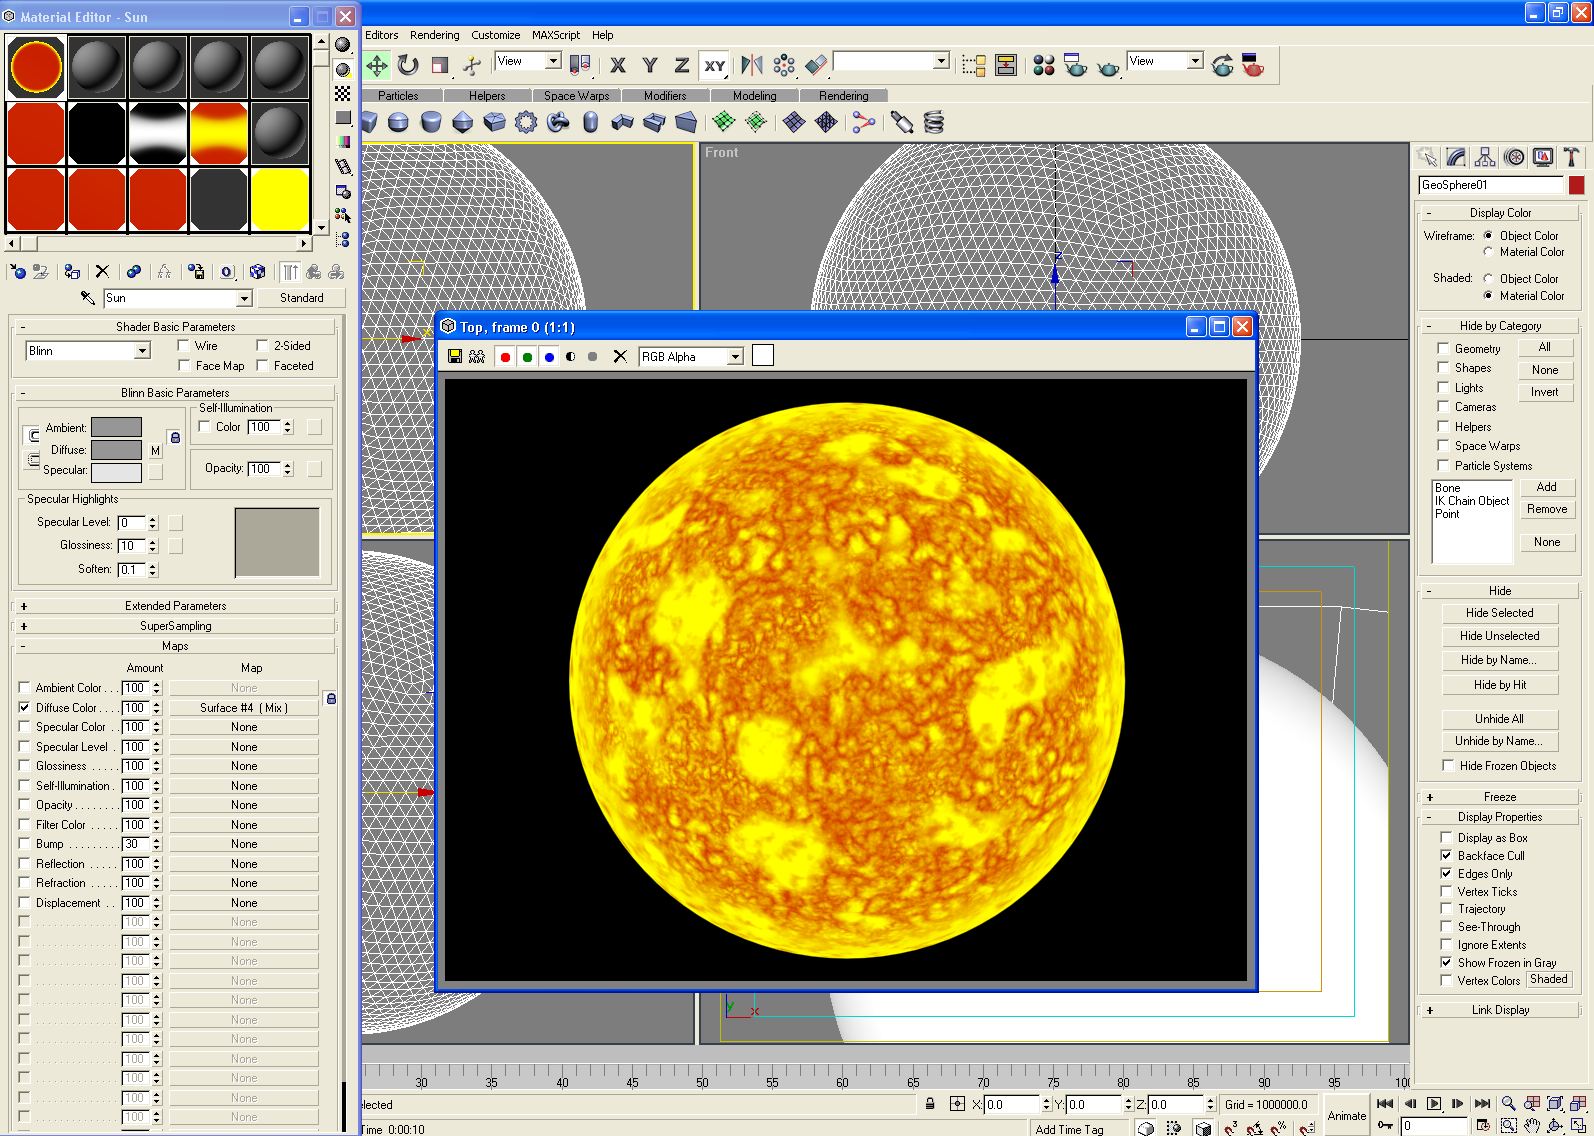
Now create a new "Mix" texture in an empty slot (copy any texture like we have been doing) and name it 'Surface #4'. Now drop "Surface #3" into the top map slot, "Surface #2" into slot 2 and "Mix #3" into the "Mix Amount" slot. Now open the material "Sun" and drop the newly created "Surface #4" into the diffuse colour slot and re-render. What we have done there is use a falloff map to make our suns surface fade from "Surface #3" to "Surface #2" as it gets closer to the edge of the sphere. | |||
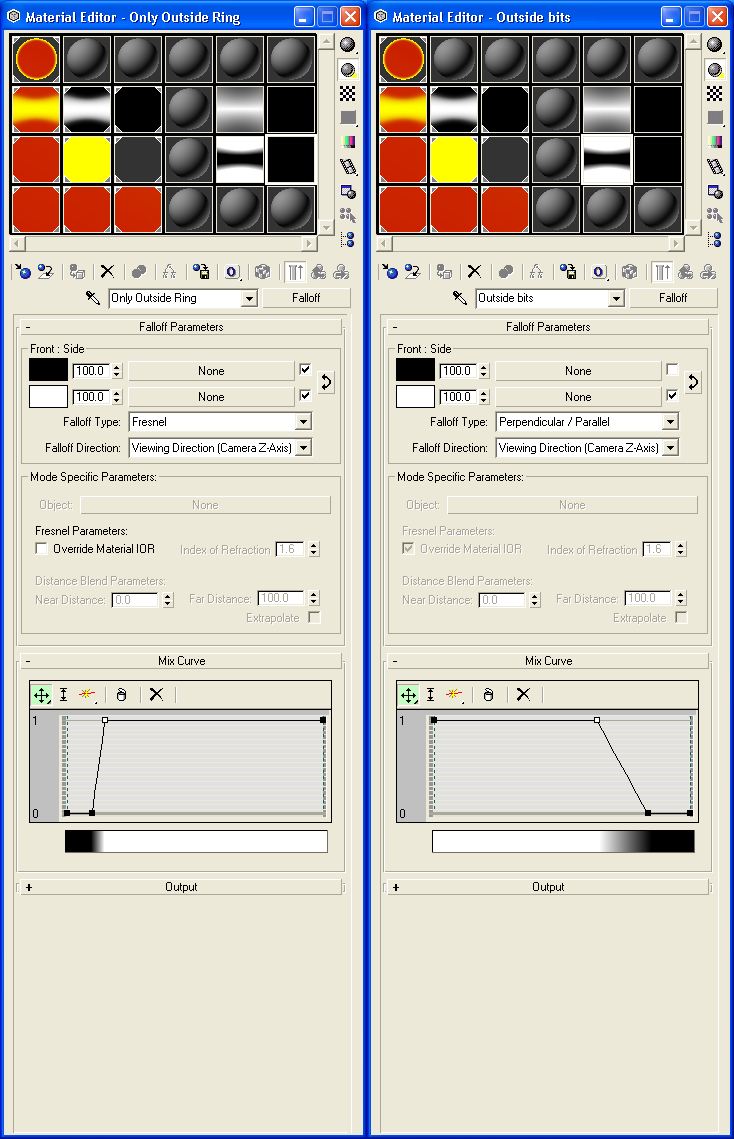
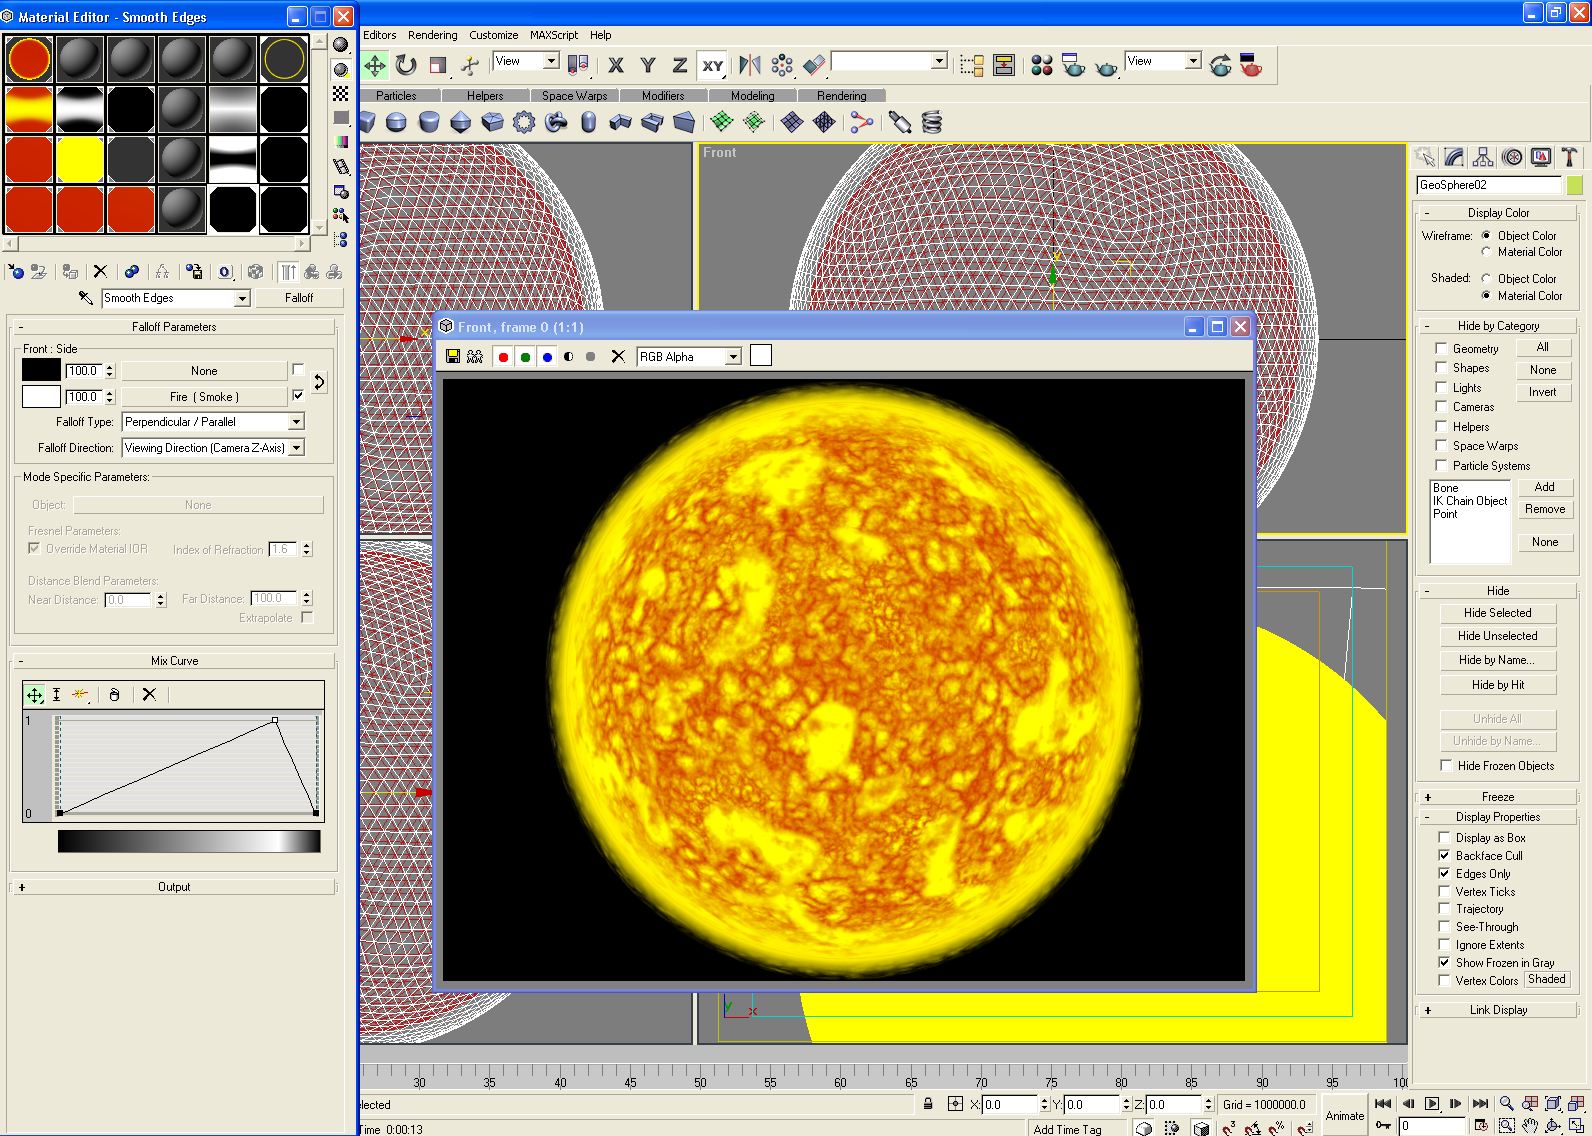
Now it looks a LOT better! BUT… it still has a very sharp edge and there is no flames coming out of the sides at all. To solve this problem we need to create a second "GeoSphere" or "Sphere" and make its radius slightly bigger than the sun '1500000' and '20' segments again. Now create four more textures in free slots. Make three of them of type "Falloff" and the other one type "Mix" now name the fallout ones 'Only Outside Ring', 'Outside bits' and 'Colour' (And YES Spell colour the English way not American way…  ). Then call the "Mix" one 'Transparency' (Yes I have given up on thinking of names ). Then call the "Mix" one 'Transparency' (Yes I have given up on thinking of names  ). Now drop "Outside bits" into the map slot next to "Color #2" and "Only Outside Ring" into the map slot next to "Mix Amount" on "Transparency". Now make the "Falloff Type" of "Only Outside Ring" "Fresnel" and un-select "Override Material IOR". Next make the "Mix Curve" of "Only Outside Ring" like the top one in the attached picture and the one from "Outside bits" like the bottom one. ). Now drop "Outside bits" into the map slot next to "Color #2" and "Only Outside Ring" into the map slot next to "Mix Amount" on "Transparency". Now make the "Falloff Type" of "Only Outside Ring" "Fresnel" and un-select "Override Material IOR". Next make the "Mix Curve" of "Only Outside Ring" like the top one in the attached picture and the one from "Outside bits" like the bottom one.
|
|
|||
|
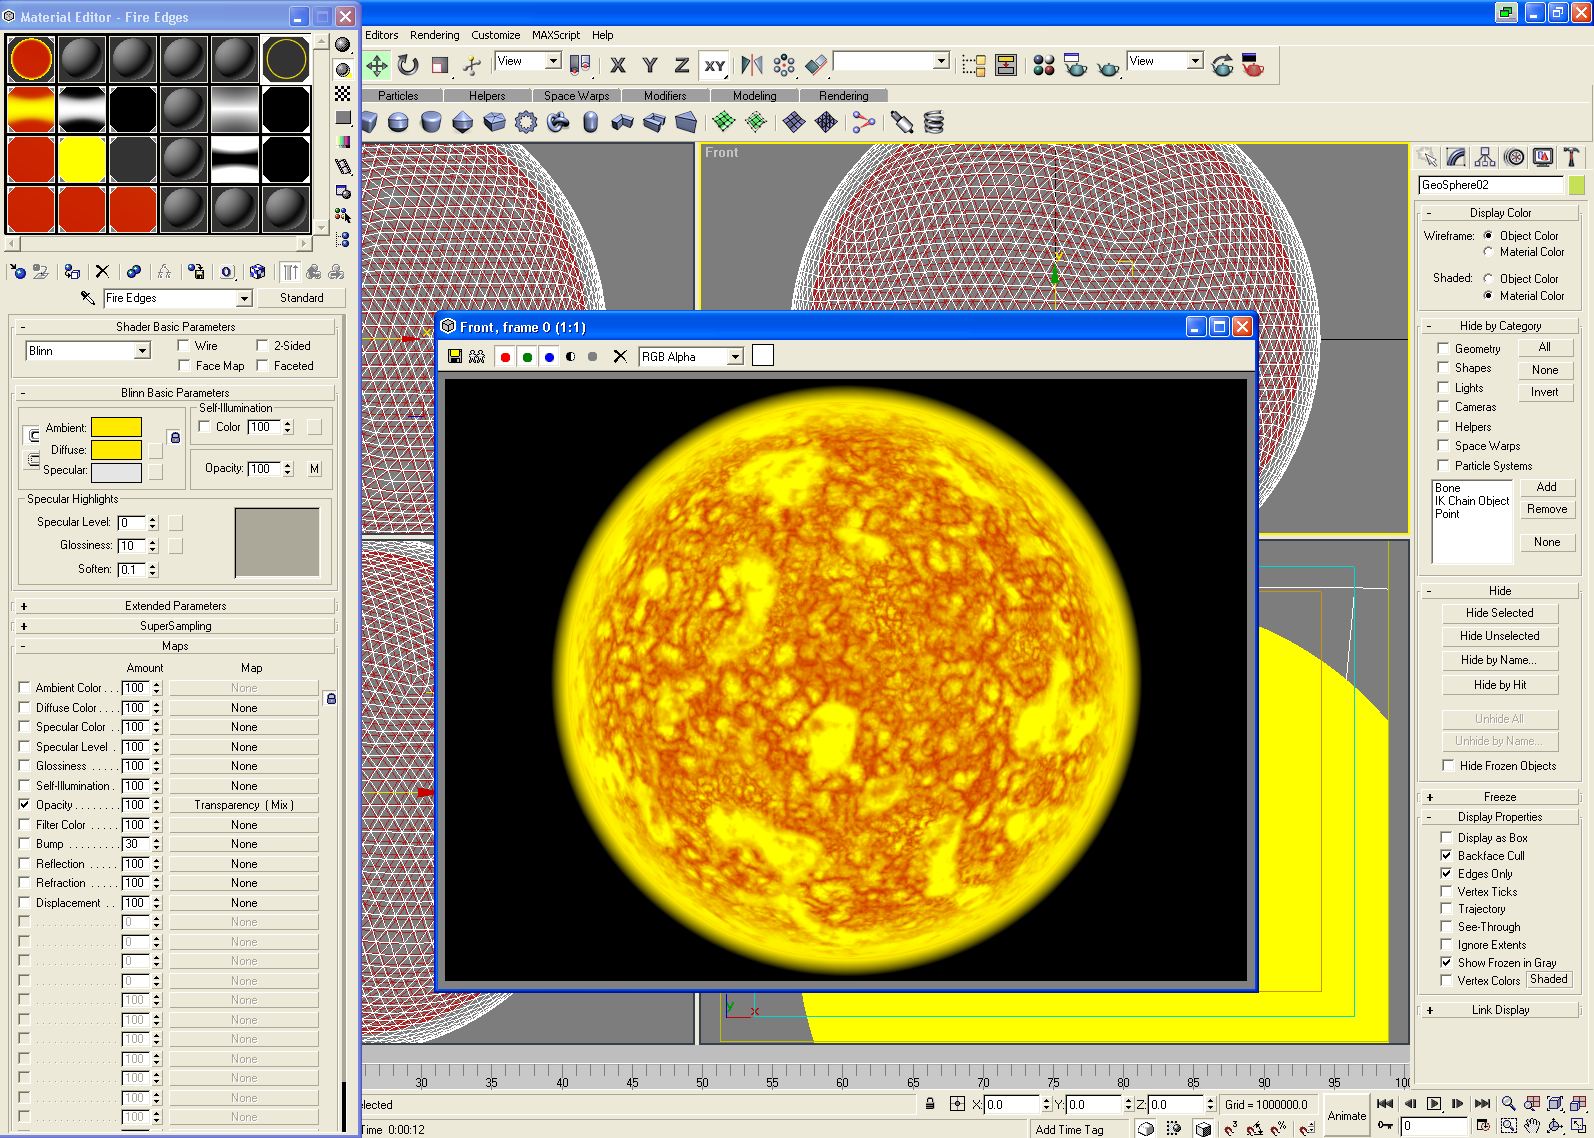
What we just created is what will decide when and how our new sphere will be transparent so drop it into the "Opacity" map slot of a new empty material slot (Sphere) and name the new material 'Fire Edges'. Now change the "Ambient/Diffuse" colour this is the two (Currently) grey boxes (They are currently linked together) under the "Blinn Basic Parameters". Change them to Red: 255, Green: 234 and Blue: 0. Increase the "Self-Illumination" to 100. Now drop "Fire Edges" onto the new sphere object we put into the scene and re-render. IT GLOWS! | |||
| But we don't want a glow do we? We want it to look like flames coming of the surface of the sun… to accomplish this I used a smoke with a fallout on it. First create two more textures in some blank slot make one of them a "Falloff" and name it 'Smooth Edges' then make the other one a "Smoke" and name it 'Fire'. Now drop the "Fire" texture into the lower slot off "Smooth Edges" and change "Smooth Edges" change the graph to look like the one in the picture. Now go to the texture "Fire" and change the "Size" to'1000000', the "# Iterations" to '10' and all of the "Tiling" to '10'. Now drop the texture "Fire" into the bottom slot of "Smooth Edges" and "Smooth Edges" into the top slot of "Outside bits" and re-render… |
|
|||
|
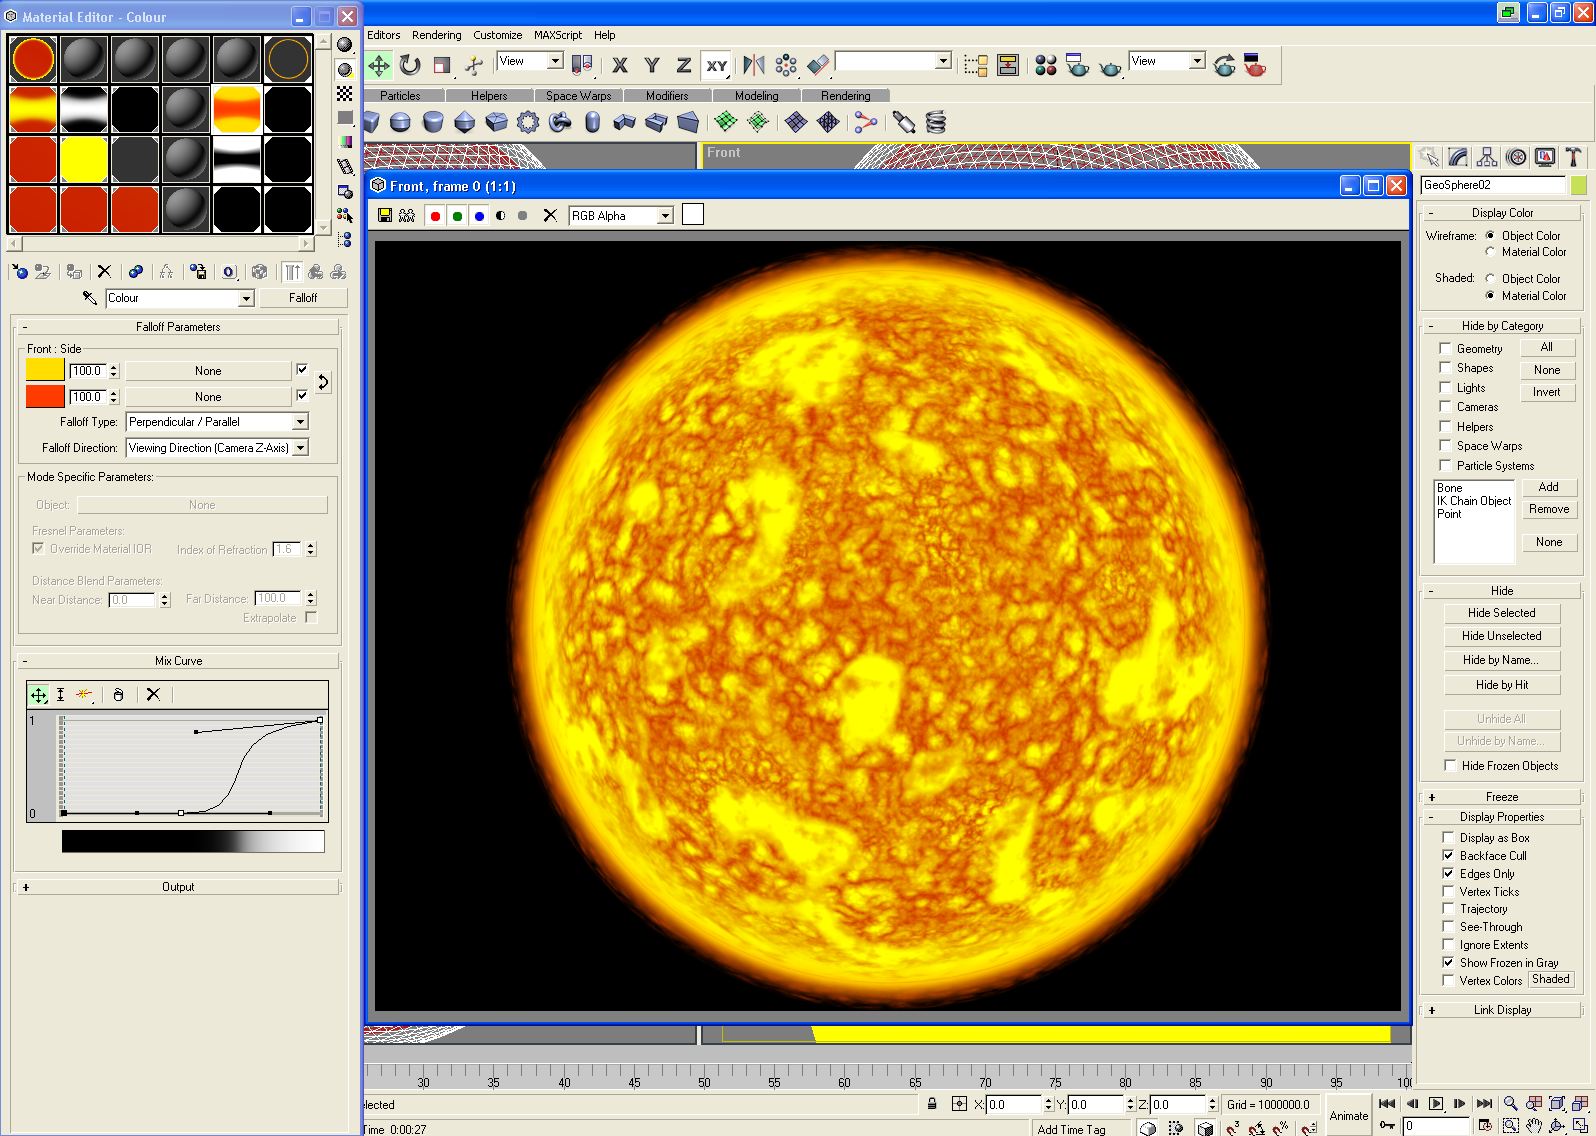
That is MUCH BETTER!!! Now all it needs is to go a bit darker towards the edges. This is why we created the "Colour" texture. So drop it into the "Diffuse Color" slot of "Fire Edges". Now change the top colour (Currently black) of "Colour" to Red: 255 Green: 222 Blue: 0 and the second colour (Currently white) to Red: 255 Green: 60 Blue: 0 and make the graph look like the one in the picture and re-render… | |||
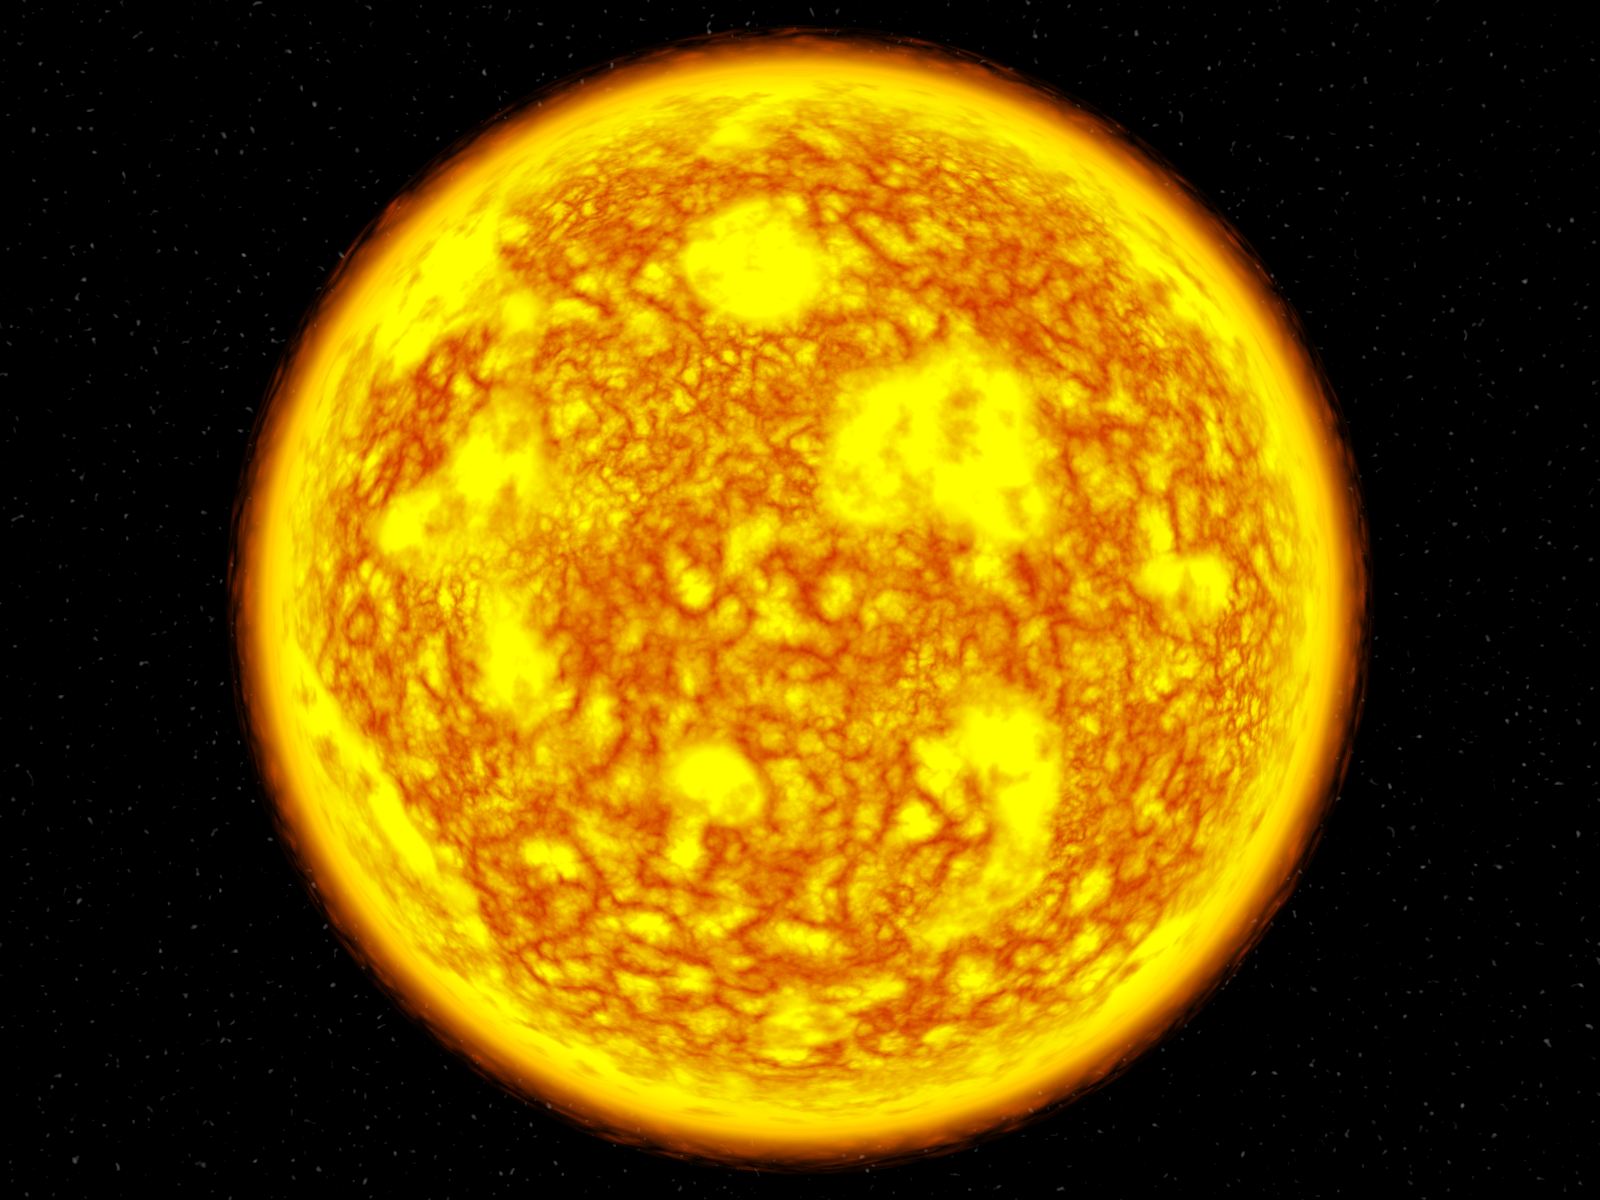
| WALLA! One sun… Now let's add some stars for the hell of it! I know you wouldn't be able to see stars behind a sun as your eye/camera would not be able to pickup the small amount of light a distant star would give off compared with the light the close sun gives off but it looks good! :-p As it seems impossible to turn a sample slots into a texture we will do it manually. First select an empty sample slot (Gray sphere for Max 4) and scroll down to the "Maps" section click on one of the empty maps ("None") and select "Noise". This will take you into the options for the new map of type "Noise" go back to the previous screen and drag and drop the new map of type "Noise" on top of the Sample slot we have used to create this is now a texture that we can use. Now change the "Size" to '0.3', the "Low" to '0.65' and rename it 'Stars'. That texture needs to be applied to the background of our scene. To do this go to "Rendering" on the top bar and then "Environment…" and drop "Stars" into the "Environment Map" slot and re-render... If you look closely at the black background you will see one or two stars. As usual if you mess around with the settings of the "Stars" texture you can change the amount of stars as well as the size and other options. I hope that this tutorial helped you create the sun you where after as well as learn the skills needed to create it so you can use them on other projects. I STRONGLY suggest that you mess around with the settings to help you understand what they do and how to achieve the results you want from each of the built in maps that 3DS Max 4 has to offer. If you have not understood ANY of this tutorial please tell me so I can help you and also correct the tutorial for others. |
|
|||
|
|
||||
Last update: Year: 2006 Month: 07 Day: 02 Time:21:57 (UK Time)
All material copyrighted © by Zasurus www.thebzone.net unless otherwise specified.